

Convert a date range to a list of dates with Power Query
In this post, I’ll show you how you can take a range of dates (defined by a start date and end date), and convert it into a full list of dates. This technique is by no means new, but we’ll expand this approach by converting the logic into a custom function in Power Query so you can repeat the logic in separate queries.
The logic behind creating the date list
I was recently working on a report where I needed to add a slicer that filtered values down to different school holiday periods. To achieve this, I needed a list of all the dates where school holidays fell, and also the name of the school holiday period (so that they could be distinguished).
Instead of the full date list, online sources typically report on the start and end dates for school holidays. Here’s what such a list of holidays may look like:

To get this into a complete list of all school holiday dates, I followed an approach described by Miguel Escobar which I’ll summarise from his post below:
1. Change the data type for the two date columns from Dates to Integers. This makes the next step simple to implement.

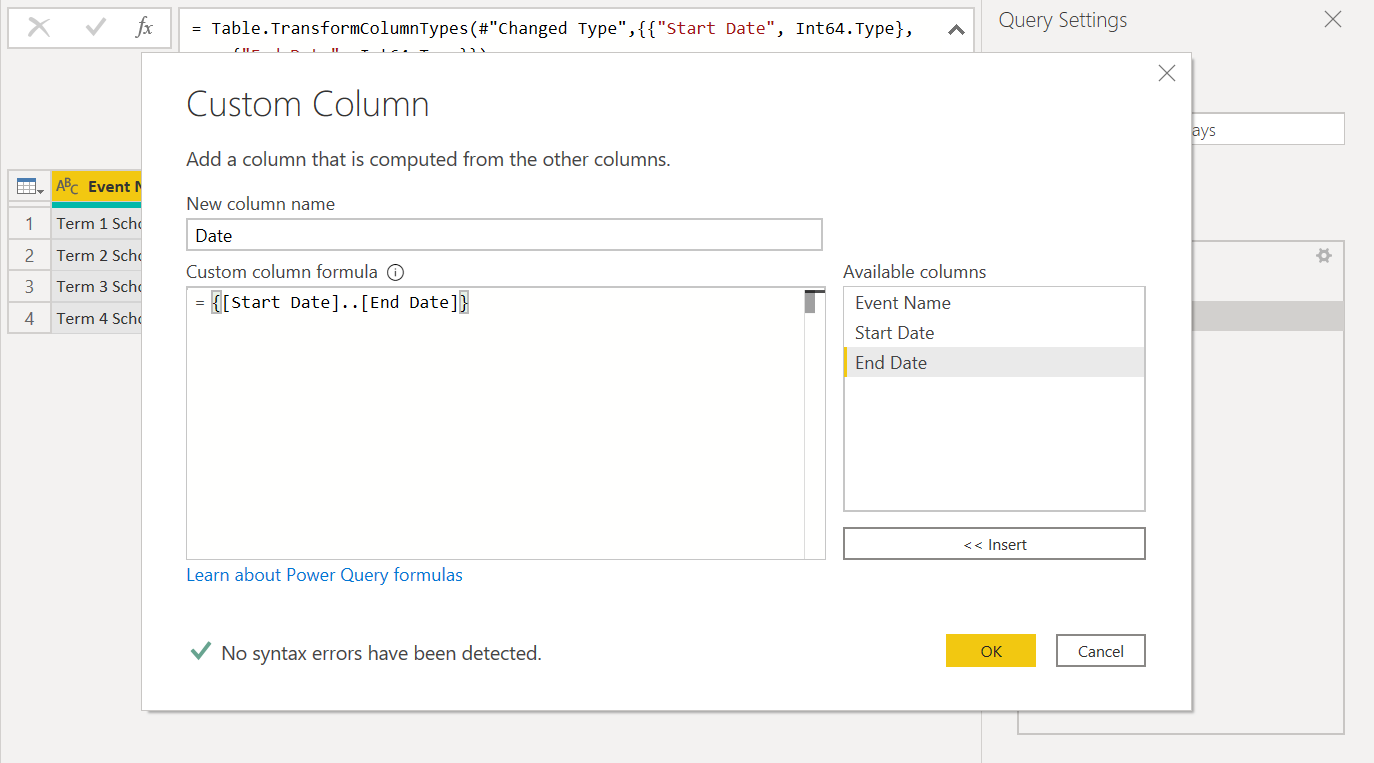
2. Add a new column that contains the list of integers between the two columns. Power Query has an easy syntax to create this sequence of numbers…
3. Expand the new Date list column, then convert the data type of the column from Integer to Date.
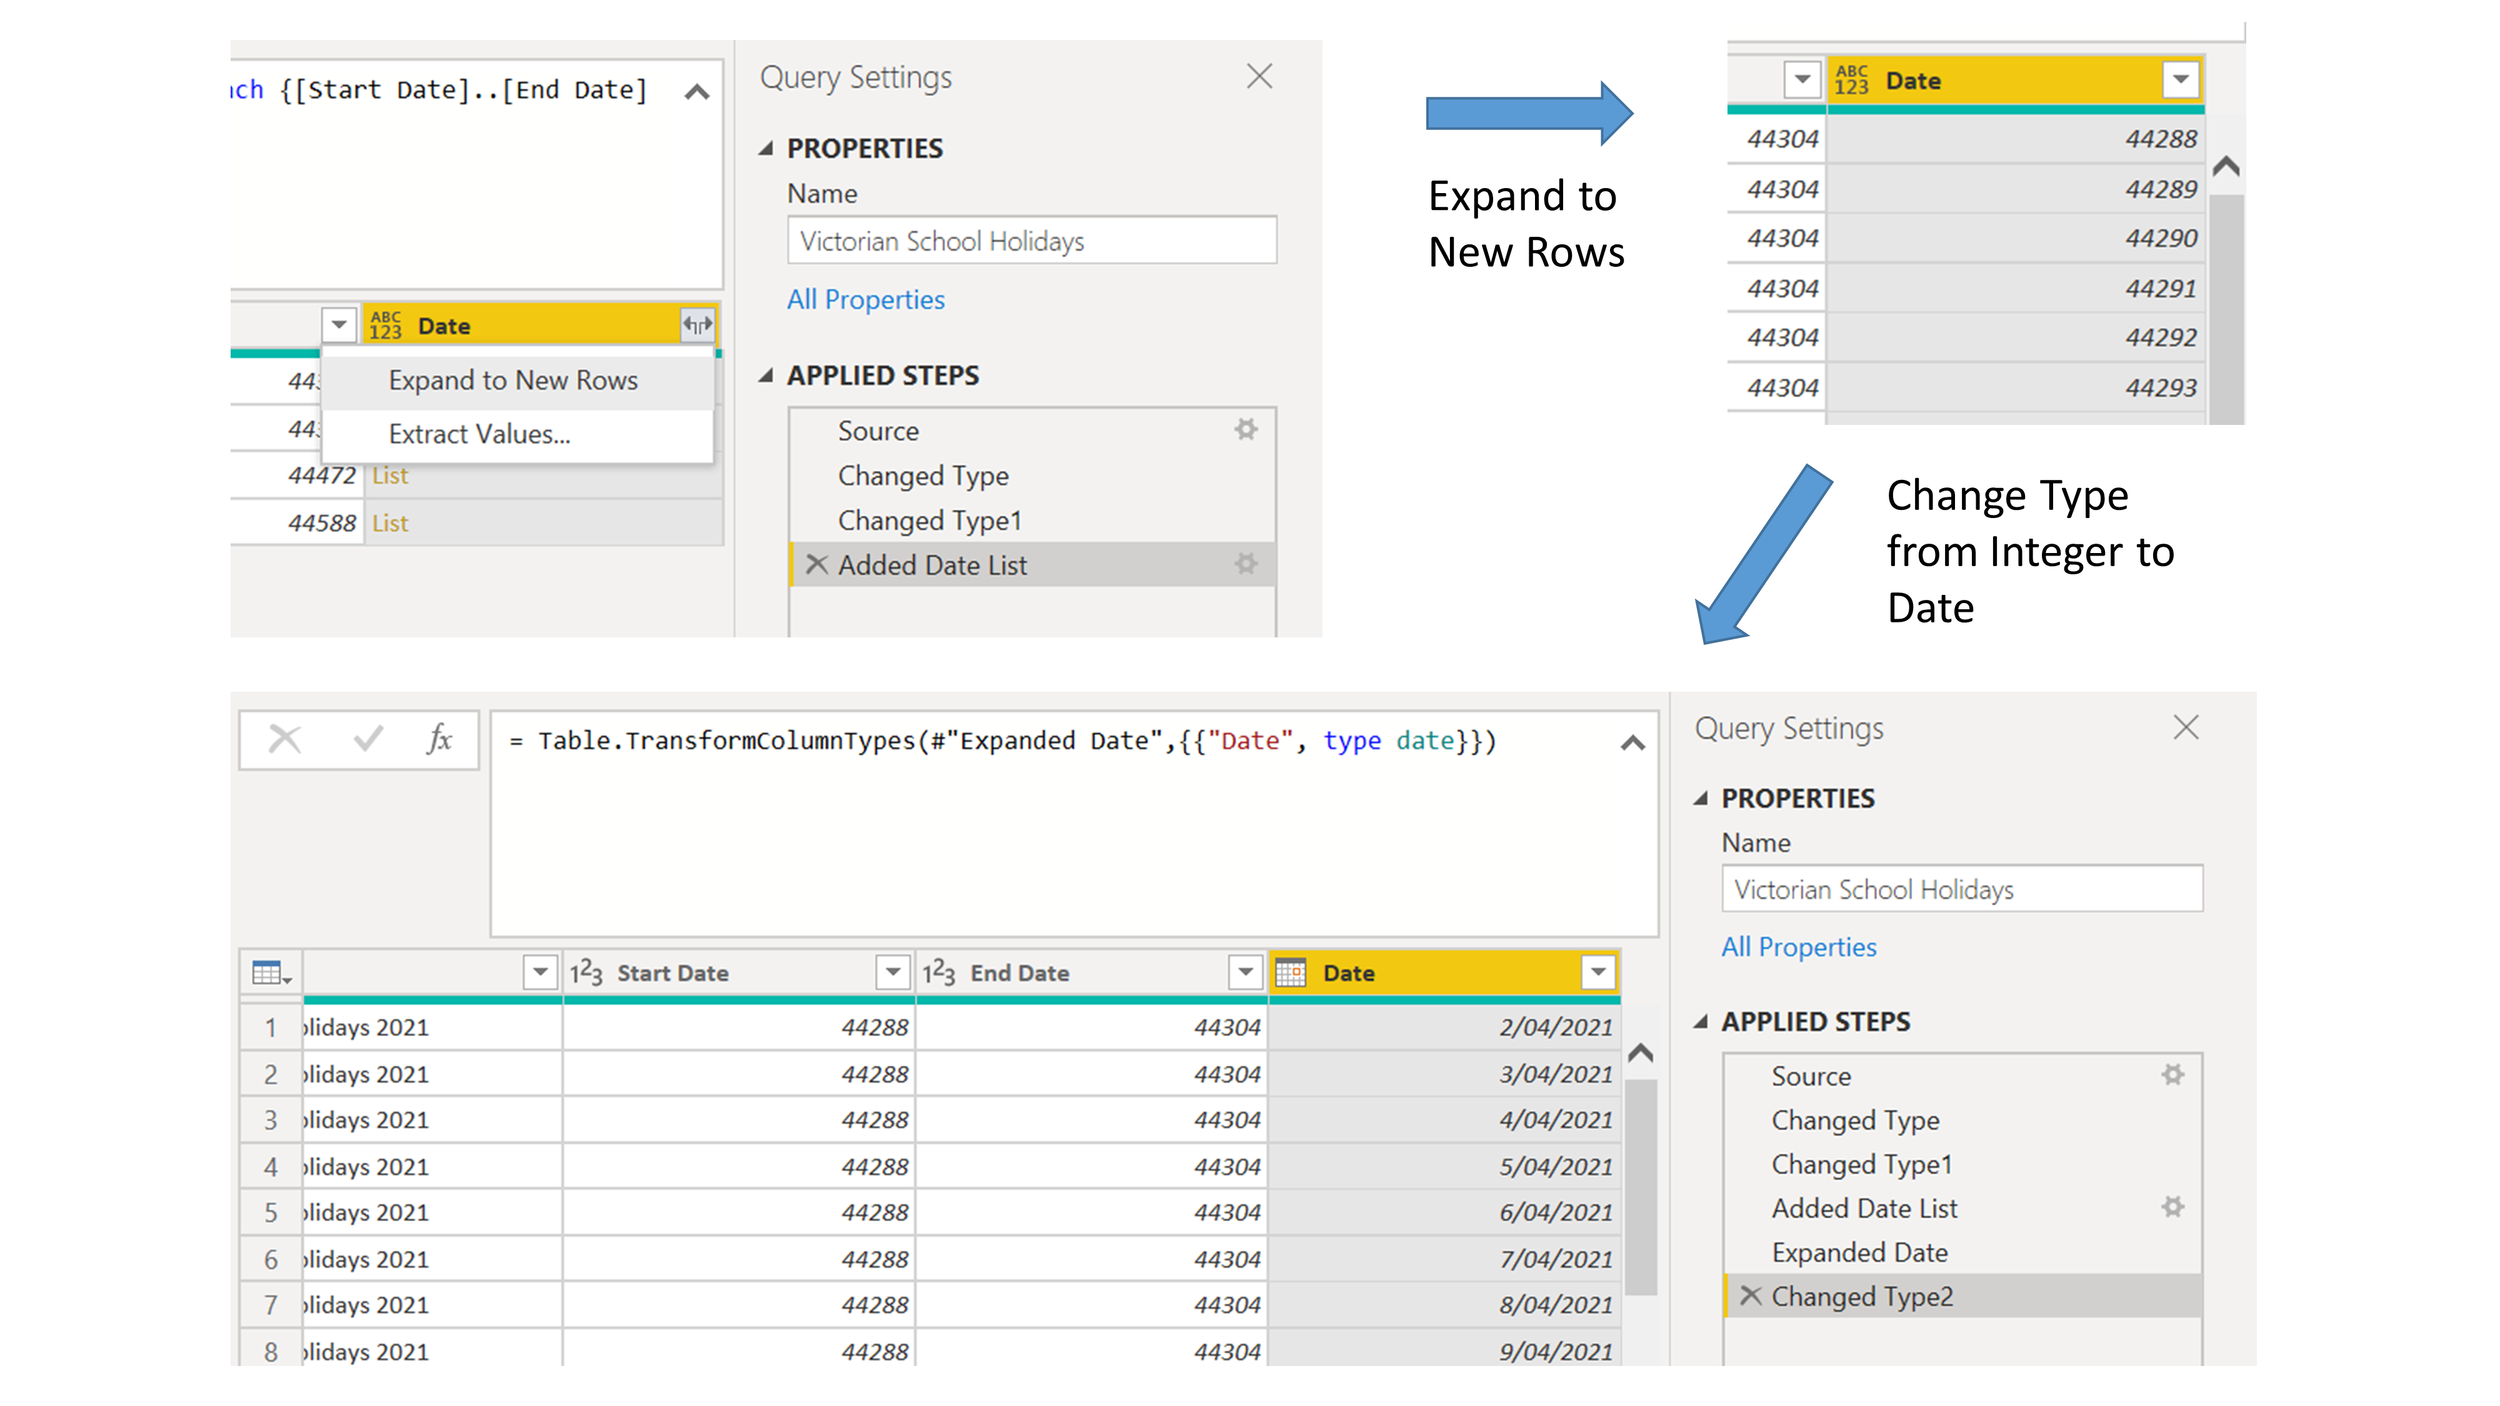
4. Delete the original Start Date and End Date columns, giving us our final result.

Pushing the logic into a custom function
The approach above works well to create the date range. But as I continued to develop the report, I had more requests come in to include additional date ranges to slice on, like promotional periods and COVID lockdown periods. In keeping with the ‘Don’t Repeat Yourself’ principle, at this point I decided to translate the logic above into a single function to be used as a step in each query. Here’s the function that I built…
let
// Main function
fn = (source_table as table, optional start_date_column_name as text, optional end_date_column_name as text, optional date_column_name as text) =>
let
// If column names are not provided, use defaults
Start_Date_Column_Name = if start_date_column_name is null then "Start Date" else start_date_column_name,
End_Date_Column_Name = if end_date_column_name is null then "End Date" else end_date_column_name,
Date_Column_Name = if date_column_name is null then "Date" else date_column_name,
// Follows approach taken in this blog... https://www.poweredsolutions.co/2019/07/23/fill-dates-between-dates-with-power-bi-power-query/
Source = source_table,
// This step explicitly renames the columns containing start and end dates. It ensures that you can consistently reference these columns in the later step where the date list is generated as integers.
#"Renamed Columns" = Table.RenameColumns(Source,{{Start_Date_Column_Name, "Start Date for Date Range"}, {End_Date_Column_Name, "End Date for Date Range"}}),
// This provides an easier way to generate a date list, as you just need to generate the list of numbers between two integers.
#"Changed Date Ranges to Integers" = Table.TransformColumnTypes(#"Renamed Columns",{{"Start Date for Date Range", Int64.Type}, {"End Date for Date Range", Int64.Type}}),
// In case dates are entered incorrectly, remove errors.
#"Removed Errors" = Table.RemoveRowsWithErrors(#"Changed Date Ranges to Integers", {"Start Date for Date Range", "End Date for Date Range"}),
// Add the list of relevant dates to each row as integers.
#"Added Date Integer List" = Table.AddColumn(#"Removed Errors", Date_Column_Name, each {[Start Date for Date Range]..[End Date for Date Range]}),
#"Expanded Date List" = Table.ExpandListColumn(#"Added Date Integer List", Date_Column_Name),
#"Changed Dates to Date Type" = Table.TransformColumnTypes(#"Expanded Date List",{{"Start Date for Date Range", type date}, {"End Date for Date Range", type date}, {Date_Column_Name, type date}}),
#"Removed Start and End Dates" = Table.RemoveColumns(#"Changed Dates to Date Type",{"Start Date for Date Range", "End Date for Date Range"})
in
#"Removed Start and End Dates",
// Function Documentation
fnType = type function
(
source_table as
(type table meta [
Documentation.FieldCaption = "Table to transform"
]),
optional start_date_column_name as
(type text meta [
Documentation.FieldCaption = "Name of Start Date column",
Documentation.SampleValues = {"Start of Period","Sales Promotion Start Date"}
]),
optional end_date_column_name as
(type text meta [
Documentation.FieldCaption = "Name of End Date column",
Documentation.SampleValues = {"End of Period","Sales Promotion End Date"}
]),
optional date_column_name as
(type text meta [
Documentation.FieldCaption = "Name of Date column to return",
Documentation.SampleValues = {"Date in Period","Sales Promotion Date"}
])
) as list meta
[
Documentation.Name = "fn_Expand_Date_Range_To_List",
Documentation.Description = "
This function takes a table with columns for start date and end date of a period, and returns a table with one record for each date within that period.
By default, the columns to transform are assumed to be called ""Start Date"" and ""End Date"", and the output date column is called ""Date"".
These column names can be adjusted with the optional input parameters.
"
]
in
Value.ReplaceType(fn, fnType)

Here are a few considerations that I baked into the function definition, which are good to bear in mind whenever you define your own custom functions.
I made sure to document the function, both with comments in the M code to explain steps and by explicitly defining documentation. If you aren’t in the practice of documenting your custom functions, Lars Schreiber has a good blog series on how to go about it.
I provided optional parameters so that you can identify which columns to use as your Start Date and End Date, for when the names in your query vary from these generic names.
While I was thinking about different column names, I also added the option to define what the output name for the final Date column would be, if you don’t want to generically call it Date.
I also added a step to remove errors from your input date columns if they happen to contain them. Depending on why the errors occured, it may be more useful to replace the errors before applying the function. Adding in the error-removing logic ensures that the function doesn’t break if errors happen to occur.
If you find yourself in a situation where you have to expand a date range into a full list, feel free to give this one a go!